Water Heater Inspection: What Every Inspector Should Check & Document
A water heater inspection is one of those areas where thoroughness really separates a competent inspector from someone going through the motions. Water heaters sit in basements, utility closets, and garages quietly doing their job — until they don't. And when they fail, the consequences range from "no hot water" to "catastrophic flood that destroys an entire floor of the house."
Every home inspection includes the water heater, and every water heater inspection checklist should cover safety devices, fuel connections, venting, condition, age, and installation compliance. This guide walks through exactly what to check and document for gas, electric, tank, and tankless units — with the practical focus of an inspector standing in front of the unit with a flashlight and a clipboard.
Why Water Heaters Deserve Careful Inspection
Water heaters are under constant stress. They heat water to 120-140°F, maintain that temperature 24/7, and manage internal pressures that would rupture the tank if safety devices failed. The average tank water heater lasts 8-12 years — and many of the units you'll inspect are at or past that range.
Common water heater failures include:
- Tank rupture or slow leak — corrosion compromises the tank lining
- TPR valve failure — the last line of defense against catastrophic overpressure
- Carbon monoxide production — from improperly vented gas units
- Scalding risk — from incorrect temperature settings
- Fire hazard — from improper clearances or gas leaks
Note
According to the Insurance Institute for Business & Home Safety, water heater failures cause an average of $4,900 in property damage per incident. Catastrophic tank failures in occupied spaces can cause tens of thousands in damage — and present genuine safety risks to occupants.
Your inspection report on the water heater needs to document everything that affects safety, function, and remaining useful life. Let's go system by system.
Step 1: Identify the Unit
Before you start checking components, document the basics:
- Fuel type: Gas (natural gas or propane), electric, or hybrid/heat pump
- Configuration: Tank (storage) or tankless (on-demand)
- Capacity: Tank size in gallons (typically 40-80 gallon residential)
- Manufacturer and model number
- Serial number — critical for determining age
- Location: Basement, garage, utility closet, attic, crawl space
Determining Age
Most manufacturers encode the production date in the serial number. The format varies by brand — Building Intelligence Center maintains a decoder for major brands. Common patterns:
- First four digits as MMYY (e.g., 0318 = March 2018)
- Letter-coded years (A=2001, B=2002, etc.)
Document the age in your report. Buyers want to know how many years are left, and agents need this for negotiation context. A 12-year-old tank water heater isn't a defect — but it's relevant information that belongs in the report. Our home inspection report writing guide covers how to frame age-related observations without overstepping.
Step 2: Temperature and Pressure Relief (TPR) Valve
The TPR valve is the single most important safety device on a water heater. If the thermostat fails and the water overheats, or if the tank overpressurizes, the TPR valve opens to release water and prevent a potential explosion. Never skip this.
What to Check
- Presence: Is there a TPR valve installed? (Rarely missing on modern units, but verify.)
- Proper rating: The valve should be rated for at least the working pressure and temperature of the water heater (typically 150 PSI and 210°F).
- Discharge pipe:
- Must be connected to the TPR valve
- Must terminate within 6 inches of the floor or drain (not into a wall, not into a sealed pipe)
- Must be the same diameter as the valve outlet (typically ¾")
- Must pitch downward continuously — no uphill sections or traps
- Must not be threaded on the discharge end (to prevent capping)
- Must not reduce in size
- Must not discharge where it would cause damage (e.g., directly onto electrical equipment)
Common TPR Deficiencies
- No discharge pipe — valve terminates open above the unit. A discharge at height could spray scalding water on anyone nearby.
- Discharge pipe routed upward — creates a trap, prevents proper drainage, and defeats the purpose
- Discharge pipe too short — terminates more than 6 inches above the floor
- Discharge pipe plumbed to exterior — acceptable in some jurisdictions, but verify it doesn't freeze in cold climates
- Corroded or leaking TPR valve — signs of past activation or failure
- TPR valve past its test date — manufacturers recommend replacement every 3-5 years, though this varies
Key Takeaway
Do NOT test-operate the TPR valve during a home inspection. Lifting the lever on an older valve can cause it to leak permanently or fail. Document the visual condition and the discharge pipe installation. Note if it appears corroded, seized, or past recommended service life. Testing TPR valves is outside the scope of a standard home inspection per ASHI and InterNACHI Standards of Practice.
Step 3: Gas Supply and Connections (Gas Units)
For gas water heaters, the fuel supply is a critical safety check.
What to Check
- Gas supply line: Should be rigid (black iron, CSST, or copper where code permits). Flexible connectors are acceptable for the final connection to the appliance.
- Drip leg (sediment trap): A short vertical pipe extending below the gas inlet tee. Required by code to trap moisture and debris before they enter the gas valve. Missing drip legs are one of the most common deficiencies.
- Shut-off valve: Must be within sight and reach of the appliance. Should be a quarter-turn ball valve (preferred) or a standard gas cock.
- Gas valve condition: No corrosion, no signs of leaking. All connections should be tight.
- Flexible connector condition: No kinks, no corrosion, within its rated lifespan.
Using a Gas Leak Detector
Carry a combustible gas detector and check all accessible joints and connections. Even a small gas leak is a safety hazard. If you detect gas, document it, recommend immediate evaluation by a qualified plumber or gas technician, and consider whether the leak severity warrants advising the client to shut off the gas supply.
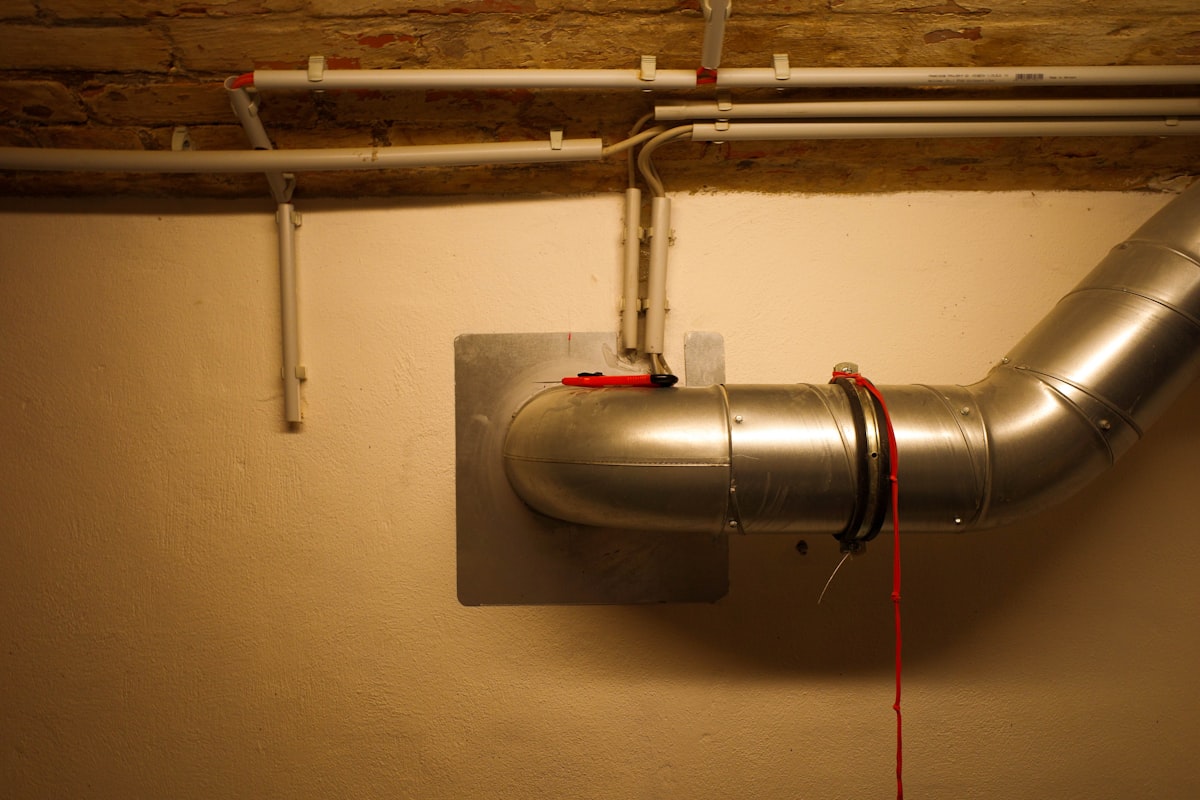
Step 4: Venting and Combustion Air (Gas Units)
Improper venting is a carbon monoxide hazard. This is literally life-safety territory.
Atmospheric (Natural Draft) Venting
Most conventional gas tank water heaters use atmospheric venting — hot combustion gases rise naturally through a draft hood and single-wall or B-vent pipe to the exterior.
Check:
- Draft hood: Properly seated on the water heater. Not displaced, damaged, or missing.
- Vent pipe connections: All joints secured with sheet metal screws (minimum 3 per joint). No gaps, no separations.
- Vent pipe slope: Must slope upward at least ¼" per foot toward the chimney or exterior termination. Horizontal runs should be minimized.
- Vent pipe clearances: Single-wall vent pipe must maintain 6" clearance from combustible materials. B-vent requires 1" (check specific manufacturer specs).
- Chimney connection: If venting into a masonry chimney, the vent pipe must extend into but not beyond the flue. The chimney should be in serviceable condition.
- Common venting: If the water heater shares a vent with a furnace, verify proper sizing and that the connections are correct. When a high-efficiency furnace replaces a conventional one, the orphaned water heater may now be too small to properly draft in the oversized flue. This is a common issue — document it. Our HVAC inspection checklist covers furnace venting in detail.
Power Vented Units
Power-vented water heaters use a fan to push exhaust gases through PVC or CPVC pipe to the exterior. Check:
- Fan operation: Does the fan run when the burner fires?
- PVC pipe condition: No cracks, proper joints, properly supported
- Exterior termination: Screen intact, not blocked by debris or snow
- Clearances from windows and openings: Typically 4-12 feet depending on jurisdiction
Direct Vent Units
Direct vent water heaters draw combustion air from outside and exhaust to outside through a concentric or two-pipe system. These are generally safer from a carbon monoxide standpoint. Verify the intake and exhaust terminations are clear and properly located.
Combustion Air Supply
Gas appliances need adequate air for combustion. Check:
- The room isn't sealed — there should be vents, louvers, or sufficient room volume per code
- For enclosed utility closets, combustion air openings must be present (typically two — one high, one low)
- No storage blocking combustion air pathways
Step 5: Electrical Connections (Electric Units)
Electric water heaters have their own set of inspection points.
What to Check
- Dedicated circuit: Electric water heaters should be on a dedicated circuit. Typically 240V/30A for a standard 40-50 gallon unit.
- Wire gauge: Must match the breaker size (10 AWG for 30A is standard)
- Connection type: Should be hard-wired with a disconnect switch within sight of the unit, OR connected via a flexible whip to a junction box
- Junction box cover: The electrical connection cover plate on top of the water heater must be in place. Missing covers expose wire connections.
- Grounding: Verify the unit is properly grounded
Common Electrical Deficiencies
- Missing junction box cover plate
- No disconnect switch within sight
- Undersized wiring for the breaker
- Use of extension cords (yes, this happens)
- Missing or improper bonding
Step 6: Expansion Tank
Thermal expansion tanks are required when a closed plumbing system is present (a system with a check valve, pressure-reducing valve, or backflow preventer on the main water supply).
What to Check
- Presence: Is an expansion tank installed? If the system is closed and there's no expansion tank, document it.
- Location: Should be on the cold water supply line, near the water heater
- Support: Must be properly supported — not hanging by the pipe connection alone
- Pre-charge pressure: Should match the house water pressure (typically 40-80 PSI). You can check this with a tire gauge on the Schrader valve, but most inspectors simply note the presence and condition.
- Waterlogged condition: Tap the tank. A properly functioning tank sounds hollow on top (air) and solid on bottom (water). If the whole tank sounds solid/water-filled, it's waterlogged and needs replacement.
Step 7: Seismic Straps (Where Required)
Seismic strapping is required in earthquake-prone zones (primarily California, Oregon, Washington, and parts of other western states). Even where not code-required, straps prevent tank toppling during any event that causes the unit to shift.
What to Check
- Presence in seismic zones: Two straps — one in the upper third, one in the lower third of the tank
- Strap material: Metal strapping rated for the purpose (plumber's tape is insufficient)
- Attachment: Secured to wall studs or structural members — not just drywall anchors
- Tension: Snug but not crushing the tank
If you inspect in a non-seismic zone, you don't need to call out missing straps as a defect. But if they're present, verify they're installed correctly.
Step 8: Drain Valve and Sediment
What to Check
- Drain valve condition: Present, accessible, not leaking. Should be a ball-type valve (brass preferred) rather than the plastic gate valves that ship with many water heaters.
- Signs of sediment buildup: Popping, rumbling, or knocking sounds during heating cycles indicate sediment accumulation at the bottom of the tank. Note these sounds if you hear them.
- Drain pan: In locations where a leak could cause water damage (attic, upper floor, closet), a drain pan with a piped drain line should be present under the water heater.
Note
Sediment buildup reduces efficiency, increases energy costs, and accelerates tank corrosion. While flushing the tank isn't part of your inspection, documenting signs of sediment (sounds, age without maintenance evidence) is appropriate and useful to the client.
Step 9: Clearances and Installation
What to Check
- Clearance from combustibles: Gas water heaters require specific clearances from combustible materials — typically 1-6 inches depending on the manufacturer's specifications (check the label on the unit).
- Elevation in garages: In garages, gas water heater ignition sources must be elevated at least 18 inches above the floor to prevent ignition of flammable vapors (gasoline, solvents). This applies to the burner/pilot — most manufacturers meet this with a raised platform or FVIR design. Document if a gas water heater is sitting on the garage floor without elevation.
- Accessibility: The unit should be accessible for service, maintenance, and replacement. Blocked access is worth noting.
- Platform condition: If the water heater sits on a raised platform (common in garages and flood-prone areas), check the platform condition — rotted wood, unstable construction, or inadequate support are deficiencies.
Tankless Unit Installation
Tankless water heaters have different installation considerations:
- Mounting: Securely mounted to wall studs or structural backing
- Venting: Category III stainless steel vent (for non-condensing) or PVC (for condensing models) — don't mix them up
- Gas line sizing: Tankless units often require larger gas supply lines than tank units. If the homeowner replaced a tank with tankless, verify the gas line was upsized if needed. A flex connector from a 40-gallon tank connected to an on-demand unit may be undersized.
- Condensate drain: Condensing tankless units produce condensate that needs to drain properly
- Freeze protection: If installed in an unheated space (garage, exterior wall mount), verify freeze protection provisions
Step 10: Water Supply Connections
What to Check
- Shut-off valves: Both hot and cold supply lines should have accessible shut-off valves near the water heater
- Dielectric unions or fittings: Where dissimilar metals connect (e.g., copper pipes to a steel tank), dielectric unions or brass fittings should prevent galvanic corrosion
- Pipe condition: Check visible supply and outlet pipes for corrosion, leaking, or damage
- Flexible connectors: If used, verify they're rated for hot water service and in good condition
Common Deficiencies Summary
Here's a quick reference of the most frequently documented water heater deficiencies, organized by severity:
Safety Concerns (Recommend Immediate Evaluation)
- Missing or improperly installed TPR discharge pipe
- Gas leak detected at connections
- Disconnected or improperly sloped vent pipe
- No combustion air supply in enclosed space
- Backdrafting at draft hood
- Water heater not elevated 18" in garage (gas units)
Significant Deficiencies (Recommend Repair)
- Missing drip leg/sediment trap on gas supply
- Missing expansion tank in closed system
- Corroded or leaking connections
- Undersized gas line for tankless unit
- Missing disconnect switch (electric)
- No drain pan where required
Maintenance and Informational Items
- Unit at or beyond typical service life (12+ years for tank)
- Signs of sediment buildup
- Temperature set above 120°F
- Plastic drain valve (recommend upgrading to brass)
- Minor corrosion on fittings
Writing the Water Heater Section of Your Report
Your water heater section should be clear, organized, and actionable. Include:
- Unit identification: Type, fuel, capacity, manufacturer, age
- Location: Where it's installed
- Condition: Overall assessment
- Deficiencies: Specific findings with photos
- Safety concerns: Flagged prominently
For each deficiency, include a photo showing the issue clearly. A picture of a disconnected vent pipe or a missing drip leg communicates the problem better than a paragraph of text. See our inspection report guide for more on structuring effective report sections.
For field efficiency, consider tools that let you document findings as you inspect rather than reconstructing everything back at your desk. ReportWalk lets you dictate observations directly into structured report sections from your iPhone — you describe what you see at the water heater, and it organizes the findings into your report. That means less time writing and more time inspecting.
Tankless vs. Tank: Key Differences for Inspectors
| Aspect | Tank Water Heater | Tankless Water Heater |
|---|---|---|
| Lifespan | 8-12 years | 15-20 years |
| TPR valve | Yes — critical check | Yes — still required |
| Venting | Atmospheric or power vent | Direct vent or power vent (typically category III or IV) |
| Sediment | Accumulates in tank bottom | Can affect heat exchanger |
| Expansion tank | Required in closed systems | Required in closed systems |
| Error codes | N/A | Check for active error codes on display |
| Maintenance | Annual flushing recommended | Annual descaling recommended |
| Sizing concern | Gallon capacity | Flow rate (GPM) |
When inspecting tankless units, check for active error codes on the digital display. Many units will show error history even after the issue is resolved — document any codes and recommend the homeowner verify current status with a plumber. Our plumbing inspection checklist provides additional context for the whole plumbing system.
Final Thoughts
Water heater inspection is one of those areas where knowledge and attention to detail make a real difference. A thorough water heater section in your report demonstrates competence, protects your client, and distinguishes you from inspectors who just snap a photo of the data plate and move on.
Every unit tells a story — age, maintenance history, installation quality, and remaining useful life. Your job is to read that story accurately and communicate it clearly. Check the safety devices, verify the venting, document the condition, and give your client the information they need to make good decisions.